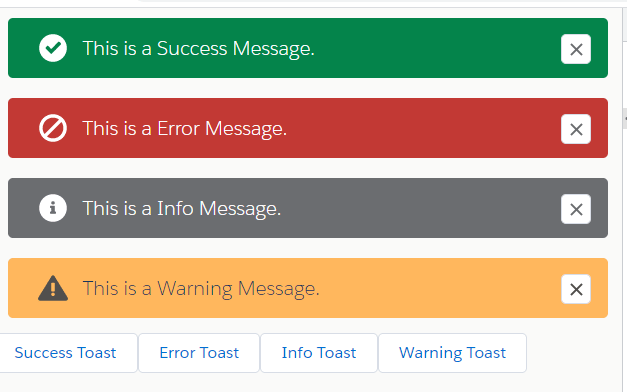
Create a Custom Toast component in Lightning Web Component easily with a little code.
Salesforce standard Toast event doesn’t work on Visualforce Pages and components displayed in Lightning Apps. But with the help of this component, you can easily show toast on any type of screen in salesforce. Just create this component in your org and include it in your parent component. As Simple as That.
This component is all-in-one & can show toast notification on all types of screens. Additionally, you can set your own auto alose time.
Custom Toast Component Features:
- Single unit component
- You can display Multiple Toast.
- WIll work on Record Detail Page, Home Page, VF Page, all…
- Ability to set the Toast Auto Close Time.
- Use Toast for Success, Error, Info, and Warning.
Working Demo
First We will create the toastNotification Lightning Web Component.
For creating a new LWC component, you need to use the VS Code IDE.
After creating the component open the toastNotification.html file and paste the below code.
|
1 2 3 4 5 6 7 8 9 10 11 12 13 14 15 16 17 18 19 20 21 22 23 24 25 26 27 28 29 |
<!-- Code by CafeForce || www.cafeforce.com || support@cafeforce.com || Mandatory Header --> <template> <div class="slds-notify_container"> <template for:each={notificationList} for:item="rec"> <div key={rec.index} class="containerClass"> <div class={rec.outerClass} role="status"> <span class={rec.innerClass} title={rec.message}> <lightning-icon icon-name={rec.iconName} alternative-text="icon" styleclass="slds-icon slds-icon_small" variant="inverse" size="small"></lightning-icon> </span> <div class="slds-notify__content"> <h2 class="slds-text-heading_small">{rec.message}</h2> </div> <div class="slds-notify__close"> <lightning-button-icon icon-name="utility:close" size="small" variant="border-filled" name={rec.index} class="slds-button" alternative-text="close" onclick={close} ></lightning-button-icon> </div> </div> </div> </template> </div> </template> <!-- Code by CafeForce Website: http://www.cafeforce.com DO NOT REMOVE THIS HEADER/FOOTER FOR FREE CODE USAGE --> |
Now open the JavaScript file toastNotification.js and paste the below code.
|
1 2 3 4 5 6 7 8 9 10 11 12 13 14 15 16 17 18 19 20 21 22 23 24 25 26 27 28 29 30 31 32 33 34 35 36 37 38 39 40 41 42 43 |
/* Code by CafeForce || www.cafeforce.com || support@cafeforce.com || Mandatory Header */ import { LightningElement, track, api } from 'lwc'; export default class ToastNotification extends LightningElement { @track type; @track message; @track notificationList = []; @track showToastBar = false; @api autoCloseTime = 5000; @api showToast(type, message) { var random = Math.random(); let notification = { 'type' : type, 'message' : message, 'index' : random, 'iconName' : 'utility:' + type, 'outerClass': 'slds-notify slds-notify_toast slds-theme_' + type, 'innerClass': 'slds-icon-utility-' + type + ' slds-m-right_small slds-no-flex slds-align-top' }; let toastList = this.notificationList; toastList.push(notification); this.notificationList = toastList; setTimeout(() => { this.closeToast(random); }, this.autoCloseTime); } close(event) { this.closeToast(event.currentTarget.name); } closeToast(rowNum) { var index = this.notificationList.findIndex(x => x.index === rowNum) if(index != -1) this.notificationList.splice(index, 1); } } |
Now we will call the component.
To use the component, first include this component in your Parent component where you want to show the Toast Notification. You can set your own Toast auto close time. The default time is 5 seconds.
|
1 2 3 4 5 6 |
<template> <c-toast-notification auto-close-time="8000"></c-toast-notification> <lightning-button onclick={showSuccessToast} label="Show Toast"></lightning-button> </template> |
When you want to show the Toast Notification, just get the toastNotification component, call its child method, and pass the values.
For Success Toast Notification, use the below code-
|
1 2 3 4 5 |
showSuccessToast() { this.template.querySelector('c-toast-notification').showToast('success', 'This is a Success Message.'); } |
For Error Toast Notification, use the below code-

|
1 2 3 4 5 |
showErrorToast() { this.template.querySelector('c-toast-notification').showToast('error', 'This is a Error Message.'); } |
To show Info Toast Notification, use the below code-
|
1 2 3 4 5 |
showInfoToast() { this.template.querySelector('c-toast-notification').showToast('info', 'This is a Info Message.'); } |
For Warning Toast Notification, use the below code-
|
1 2 3 4 5 |
showWarningToast() { this.template.querySelector('c-toast-notification').showToast('warning', 'This is a Warning Message.'); } |
Also Check:
For any queries or suggestions, comment below.
Cheers … Happy Coding … 🙂


